Calendar

Today         

PAWS Dogs Playground Party

Feb. 7

Anderson County Council

Feb. 10

MTP: "A Streetcar Named Desire"

Search

Search Amazon Here

Local

Food


Saturday
Feb272021

A Black Bean Burger that Is as Good as Beef

Greg Wilson/Anderson Observer

There are many recipes for black bean burgers floating around, but I have found this one is always a winner at my house, which generally expects meat with each meal. Some say it surpasses the flavor of a beef
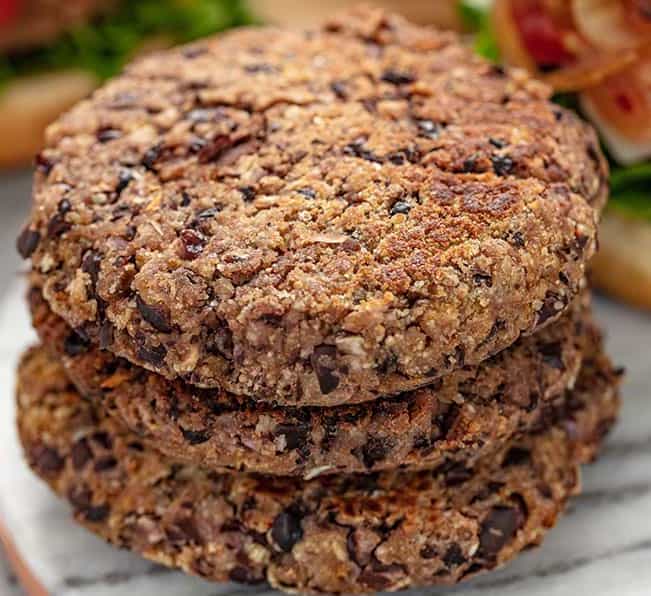
 hamburger.

Ingredients

1 onion, I use yellow or Vidalia

1 tablespoon chopped garlic

2, 15-ounce cans black beans, rinsed and drained

1 egg

¼ teaspoon smoked paprika

1 tablespoon Cajun Spice (or more if you like)

1 large egg

1 Tablespoon of 347 Steak Sauce or Worchestershire

2/3 cup panko crumbs, bread crumbs, cracker crumbs

(optional 4 ounces of baby bella mushrooms, chopped fine)

Coarse Salt and Black Pepper 

Instructions

Put the black beans on parchment paper and bake at 350 for 15-20 minutes, until the beans split and almost get crunchy. This gives them the perfect texture.  

While the beans are baking, sauté in butter/olive oil, chopped onion and garlic over medium heat until peppers and onions are soft, about 5-6 minutes. Blot some of the moisture out. Put in a large bowl or in a food processor with the remaining ingredients. Stir or pulse everything together, then add the black beans. Mash with a fork or pulse the mixture, leaving some larger chunks of beans.

Make patties, roughtly 1/3 cup of mixture per burger. 

Place patties on parchment paper and bake at 375 for 10 minutes on each side. (You can also fry in a pan with a little more butter/olive oil or grill these using greased aluminum foil and grilling 8 minutes per side.)

Wednesday
Dec232020

Coca-Cola Ham Is As Good as it Gets

INTRODUCTION

Only those who have never tried this raise an eyebrow at the idea. Don't hesitate, don't be anxious: this really works. No one who cooks it, cooks it just once: it always earns a place in every repertoire.

INGREDIENTS

Serves: 8

FOR THE HAM

  • 4½ pounds cured but uncooked ham
  • 1 onion (peeled and cut in half)
  • 3½ pints coca-cola

FOR THE GLAZE

  • 1 handful of clove
  • 1 heaped tablespoon black molasses
  • 2 teaspoons english mustard powder
  • 2 tablespoons turbinado sugar

METHOD

  1. I find now that mild-cure gammon doesn't need soaking, but if you know that you're dealing with a salty piece, then put it in a pan covered with cold water, bring to the boil, then tip into a colander in the sink and start from here; otherwise, put the gammon in a pan, skin-side down if it fits like that, add the onion, then pour over the Coke.
  2. Bring to the boil, reduce to a good simmer, put the lid on, though not tightly, and cook for just under 2½ hours. If your joint is larger or smaller, work out timing by reckoning on an hour per kilo, remembering that it's going to get a quick blast in the oven later. But do take into account that if the gammon's been in the fridge right up to the moment you cook it, you will have to give it a good 15 minutes or so extra so that the interior is properly cooked.
  3. Meanwhile, preheat the oven to 450ºF.
  4. When the ham's had its time (and ham it is, now it's cooked, though it's true Americans call it ham from its uncooked state) take it out of the pan and let cool a little for ease of handling. (Indeed, you can let it cool completely then finish off the cooking at some later stage if you want.) Then remove the skin, leaving a thin layer of fat. Score the fat with a sharp knife to make fairly large diamond shapes, and stud each diamond with a clove. Then carefully spread the treacle over the bark-budded skin, taking care not to dislodge the cloves. Gently pat the mustard and sugar onto the sticky fat. Cook in a foil-lined roasting tin for approximately 10 minutes or until the glaze is burnished and bubbly.
  5. Should you want to do the braising stage in advance and then let the ham cool, clove and glaze it and give it 30-40 minutes, from room temperature, at 350ºF, turning up the heat towards the end if you think it needs it.
Tuesday
Dec012020

Nigella Lawson's Lasagna of Love

This is what I make for my children’s birthday celebrations, for farewell suppers to send them off before they go away, and for the dinners to welcome them back when they come home again. It’s our family take on a traditional lasagne, though I’m not sure Italians would exactly welcome my deviations from the classical recipe. For one thing, I don’t make my own lasagne sheets; while I have in the past, I now routinely use dried ones out of a packet and, what’s more, I don’t boil them first. In order, then, to ensure they soften properly, I make a slightly more liquid meat sauce than is customary and, rather than have a covering of béchamel at the end, I finish with a layer of meat sauce, topped with chopped mozzarella on top. None of this is proper from a North Italian perspective, but the lasagne it yields is pleasure-giving and gratifyingly popular.

I can’t say that this is exactly faff-free to make: but it is time-consuming rather than difficult. I adore pottering about the kitchen making it. What’s more, you can layer it up (bar the mozzarella topping) in advance (see notes) and bake when needed. And I make this even if there isn’t a whole tableful of people to eat it; I freeze leftovers in individual portions, to make for most superior ready-meals at a later date.

INGREDIENTS

Makes: 9-12

METRICCUPS

FOR THE MEAT SAUCE

  • 2 large-ish onions (approx. 350g / 2¾ cups chopped)
  • 3 - 4 tablespoons olive oil
  • ½ cup whole milk
  • 4 tablespoons tomato puree
  • 2 carrots (approx. 250g)
  • 1 stick of celery
  • 4 fat cloves of garlic
  • 6 ounces rindless pancetta (or bacon)
  • A small bunch of Italian parsley (approx. 20g)
  • 1 tablespoon fresh thyme leaves (or 1 teaspoon dried thyme)
  • ⅛ teaspoon red pepper flakes
  • 12 ounces ground beef
  • 12 ounces ground pork
  • 1 cup red wine (good enough to drink) or red vermouth
  • 2 cups beef broth
  • 2 x 14 ounces tins of diced tomatoes
  • 2 teaspoons kosher salt (or 1 teaspoon fine sea salt)
  • 3 fresh bay leaves

FOR THE BÉCHAMEL

  • Vegetable prep detritus from meat sauce, above
  • 4 cups whole milk plus more as needed
  • 1 teaspoon soft sea salt flakes (or ½ teaspoon fine sea salt)
  • A good grinding of white pepper
  • 2 fresh bay leaves
  • 7 tablespoons unsalted butter
  • ¾ cup all-purpose flour
  • 3 tablespoons (approx. 40g) freshly grated parmesan

FOR ASSEMBLING

  • 18-20 dried lasagne sheets
  • 1 ball mozzarella not bufala
  • 5 tablespoons (approx. 40g) freshly grated parmesan

METHOD

  1. Chop the onions, dropping the peeled skin into a saucepan big enough to make the béchamel shortly. I use one 22cm / 9inches in diameter and 9cm / 3½ inches deep.
  2. In a large, heavy-based casserole or pan that comes with a lid – I use an enamelled cast-iron casserole of 26cm / 10 inches diameter, with a capacity of 5.3 litres / 5¼ quarts, and wouldn’t advise going any smaller – warm 3 tablespoons of the oil and, over medium-low heat, cook the onions for 5 minutes, then turn down to low and cook for a further 15 minutes, stirring every now and again until the onions are beginning to soften and colour.
  3. While the onions are cooking, first stir the tomato purée into the 125ml / ½ cup of milk, and set aside for a mo. Peel the carrots if they need it (if they’re organic, or the skin looks tender, I don’t bother) and chop them each into 3 or 4 pieces, dropping them into the bowl of a food processor and the peelings and any discarded pieces into the saucepan with the onion skin. Tear the celery into pieces and add to the processor, then peel the garlic (dropping the peelings into the béchamel pan) and add the cloves to the processor. Cut the pancetta (or bacon) up a bit and add to the processor as well, along with the parsley (you can use all the tender stems too). Strip enough thyme leaves from the stems to give you 1 tablespoon, add this too (or use 1 teaspoon of dried thyme) and blitz until everything is finely chopped, but not mush. Obviously, you could chop everything by hand. In which case, don’t drive yourself mad trying to get everything as fine as the processor version.
  4. When the 15 minutes is up on the onions, heat the oven to 170℃/150℃ Fan/325°F. Scrape every last bit of the bacony vegetable mixture from the processor into the pan, turn the heat up to medium-high, stir well and cook for 5 minutes, then turn the heat down again to medium-low, sprinkle in the chilli flakes, and cook for another 5 minutes.
  5. At this stage, I feel I should tell you to remove all the vegetables in order to brown the meat properly, but I have taken to simply adding it on top of what’s in the pan already. So, turn the heat to high, crumble in the ground beef and pork and turn well in the pan for about 5 minutes. If you need to add another tablespoon of oil, do.
  6. Add the wine (or vermouth), let it bubble up, and then pour in the beef broth, the tins of diced tomatoes, the tomato purée and milk mixture, salt and bay leaves and bring to a bubble. Taste to see if you want to add any more salt, and then clamp on a tightly fitting lid and transfer to the oven, leaving it to cook for 1 hour.
  7. Straightaway, pour the litre / 4 cups of milk for the béchamel over the vegetable peelings, add the salt, pepper and bay leaves, and bring almost to the boil, but don’t let it boil. Turn off the heat, cover with a tightly fitting lid (which will stop it from getting a skin, as well as making the flavours infuse better) and leave while the meat sauce cooks. When the meat sauce has been in the oven for 45 minutes, strain the milk into a large batter jug. If, when all the milk has dripped through, you are short of your full litre, just pour in a little more milk to top up.
  8. Clean out the pan (just with water’s fine, you don’t need soap), dry it well and melt the butter in it, then add the flour and mix together, over medium heat, for a couple of minutes, forming your roux, and cooking it a little; you should have a dingy primrose paste that, somehow, magically, seems to come away from the pan and cleave to itself as you stir and move it about.
  9. Take the pan off the heat, swap your wooden spoon for a whisk, preferably a little one that's good for removing lumps, and slowly whisk in the milk. Don't worry, by the way, that the milk (thanks to the onion skins) will have a slightly peachy tone about it. I rather like it, actually, not that it is visible in the finished sauce.
  10. When all the milk is whisked in, carry on whisking until you've got a smooth cream in the pan, and then put back on the heat, lowish, and keep whisking until you have a very, very thick sauce, with all taste of flouriness banished; this will take 5-7 minutes. Off the heat, quickly whisk in the 3 tablespoons of Parmesan and then scrape every last bit back into the batter jug, tasting for seasoning as you go.
  11. Take the meat sauce out of the oven, and give a gentle stir with a large ladle. Once you can taste it without burning your mouth, check for seasoning: it may well need more salt; do not be timid.
  12. Now, it's just a matter of layering up. My lasagne dish measures 24 x 35 x 6cm / 9½ x 14 x 2½ inches and it's a pretty tight fit. Sit the dish on a baking tray. Line the dish with a couple of ladlefuls of the meat sauce, aiming to get more liquid than meat, and cover with a layer of lasagne sheets. I get 4 sheets in the bottom layer but find that for subsequent layers I need extra, which I snap into pieces for patching gaps. Put a couple more ladlefuls of the liquidy bit of sauce into a jug or bowl, and set aside for now.
  13. Put a third of your béchamel on top of the lasagne sheets and use a spatula to help spread it a little, but don't worry about making an absolutely even, edge-to-edge covering. Top with a third of your remaining meat sauce, then cover with another layer of lasagne sheets, followed by your second third of béchamel, second third of meat sauce and third layer of lasagne sheets. Add your remaining béchamel and meat sauce in order and top with a final layer of pasta sheets and then add the set-aside liquidy meat sauce to cover, pressing down if you need to make sure the top layer of pasta is, if not submerged exactly, then lightly covered. Leave now for at least 30 minutes, but longer (up to 2 days) if needed; if you're leaving it for more than about 2 hours, you will need to refrigerate it.
  14. When you are ready to bake your lasagne, heat the oven to 200℃/180℃ Fan/400°F. Finely chop or shred the mozzarella and sprinkle over the top of the unbaked lasagne, then sprinkle over the Parmesan. Cover with foil, trying not to press it down on the top of the lasagne, and bake for 40 minutes (if it's been refrigerated it'll probably need 1 hour). Remove the foil (pull off any cheese that's stuck to it and add it back to the top of the lasagne) and cook for a further 30 minutes until it's slightly scorched in parts, the cheese gooey, the pasta swollen and runkled on top, and everything piping hot all the way through.
  15. Leave to stand, if you can bear it, for 20-30 minutes before diving in.

ADDITIONAL INFORMATION

MAKE AHEAD:
Prepare meat sauce up to 3 days ahead, cover and refrigerate until needed. Assemble lasagne (without cheese topping) up to 2 days ahead, cover and refrigerate until needed. Add cheese and bake as directed in recipe.

STORE:
Refrigerate leftovers, covered, for up to 2 days. Reheat in microwave or cover with foil and heat in 180C/160C Fan/350F oven until piping hot.

FREEZE:
Freeze assembled lasagne (without cheese topping) for up to 3 months. Tightly wrap dish in double layer of food wrap and layer of foil. Defrost for 24 hours in fridge. Add cheese and bake as directed in recipe. Freeze leftovers in airtight container for up to 3 months. Defrost overnight in fridge and reheat as above.

Recipe From "Cook, Eat, Repeat" Cookbook

Thursday
Nov192020

Dark Cherry Crumble Pie the Perfect Dessert

Maya-Camille Broussard’s shop Justice of the Pies in Chicago is inspired by her father’s work as a criminal defense lawyer on the West Side of Chicago. When she was young, she says, he would pull her away from the television and into the kitchen. In addition to turning out delicious pies like this one, Justice of the Pies is focused on community development and inclusion. This pie, which uses fresh, sweet cherries, amaretto and toasted oats, has no thickeners for a cleaner, more fruit-forward flavor.

Recipe Courtesy of Foodandwine.com

Ingredients

Ingredient Checklist

 Method

  • Preheat oven to 350°F. Stir together cherries, granulated sugar, and lemon juice in a large saucepan. Cook over medium-high, stirring often, until cherries soften and release liquid, about 15 minutes. Pour mixture into a colander set over a bowl; let drain 20 minutes.

  • Transfer drained cherries to a large bowl; reserve strained juice for another use. Stir in amaretto, almond extract, and salt. Sprinkle cornmeal in an even layer over bottom of frozen pie shell; pour cherry mixture evenly into prepared pie shell. Bake in preheated oven until crust is light golden brown, about 35 minutes.

  • While pie bakes, stir together oats, flour, and brown sugar in a bowl. Add butter; using your hands, incorporate butter until mixture resembles small peas.

  • Remove pie from oven; sprinkle with oat mixture. Return to oven; bake at 350°F until topping and crust are golden brown, about 20 minutes. Transfer to a wire rack to cool completely, at least 4 hours or up to overnight.

Sunday
Oct182020

Chicken/Mushroom Pie Offers Great Comfort Food

INTRODUCTION

Even the word pie is comforting. But then, it would be hard to deny the very real lure of pastry, especially when, as here, you know you're going to dunk it in gravied juices till its luscious lightness has become deliciously, soggily heavy. I concede, however, that making and rolling out your own pastry is not necessarily the speediest option, so I use bought, all-butter ready-rolled puff pastry and feel fine about it.

I make the pie even easier, by browning the chicken and making the sauce all in one go. And gold-crusted, welcoming pies for two people in half an hour is not bad going.

For US cup measures, use the toggle at the top of the ingredients list.

INGREDIENTS

Serves: 2

  • 3 rashers bacon (cut or scissored into 1 inch strips)
  • 1 teaspoon garlic flavored oil
  • 2 cups cremini mushrooms (sliced into eighth-inch pieces)
  • 8 ounces chicken thigh fillets (cut into 1-inch pieces)
  • 2½ tablespoons all-purpose flour
  • ½ teaspoon dried thyme
  • 1 tablespoon butter
  • 1¼ cups hot chicken broth
  • 1 tablespoon marsala
  • 8½ ounces all-butter ready-rolled puff pastry sheet  1/2 x 9½ inch)

METHOD

  1. Preheat the oven to 425. In a heavy-based frying pan, fry the bacon strips in the oil until beginning to crisp, then add the sliced mushrooms and soften them in the pan with the bacon.
  2. Turn the chicken strips in the flour and thyme (you could toss them about in a freezer bag), and then melt the butter in the bacon-and-mushroom pan before adding the floury chicken and all the flour left in the bag. Stir around with the bacon and mushrooms until the chicken begins to colour.
  3. Pour in the hot stock and Marsala, stirring to form a sauce, and let this bubble away for about 5 minutes.
  4. Take two ¼ cup pie-pots (if yours are deeper, don't worry, there will simply be more space between contents and puff pastry top) and make a pastry rim for each one - by this I mean an approx. 1cm / ½ inch strip curled around the top of each pot. Dampen the edges with a little water to make the pastry stick.
  5. Cut a circle bigger than the top of each pie-pot for the lid, and then divide the chicken filling between the two pots.
  6. Dampen the rim of the pastry again and then pop on the lid of each pie, sealing the edges with your fingers or the underneath of the prongs of a fork.
  7. Cook the pies for about 20 minutes turning them around halfway through cooking. Once cooked, they should have puffed up magnificently.

Recipe Courtesy of Nigella Express